We all know how hard it is to shop when our kids are in tow. It doesn’t take long before they start whining, crying, and complaining. I’m tired, I’m hungry, I’m just plain bored! What’s a mom to do but to cut short the shopping escapade to give in to a trip to the toy store or to the arcade or to the ice cream shop.
Wouldn’t it be nice then to be able to just leave them somewhere secure and kid-friendly so the mommies (or the daddies) can actually get some things done?
Well, if ever you’ll be doing your shopping or errands in the Greenhills malls or tyangge, there’s a go-to place called Kid’s Workshop where you can drop your kids off. Located at the 2/F Shoppesville Arcade in Greenhills Shopping Center, beside Netopia, Kid’s Workshop guarantees your kids a grand time while you take your time getting your nails done.
I got an invitation to go and try out Kid’s Workshop for a day to see what’s in store for the kids when we leave them there. The boys and I dropped by one Friday morning to check it out. We went there at around 10:30AM. 2 hours of playtime should be plenty enough, right? 5 hours later, we were still there! I had to (fake) bribe the kids with donuts just to get them to leave!
So what was there that the kids don’t ever want to leave? Come, I’ll show you.
EXPLORE
Kid’s Workshop is a spacious loft-type play area for kids of all ages to explore.
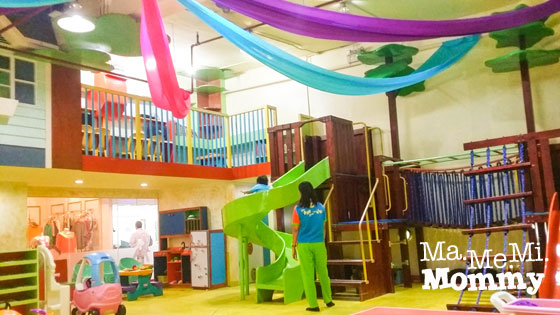
Typical of a playground, there are the usual slides and rides. Apart from those, they also have a wooden bridge, a mini rock climbing wall, a ball pool, and a ship’s steering wheel. 
Here’s the view from the top.

A staff was always there to assist the younger kids so that they can safely play with the facilities.

This curvy slide is such a hit with the kids (and the kids at heart). I totally dig this! 🙂

There’s that boy climbing up the rocks and pretending to be steering Captain Hook’s pirate ship. 
For the girls, there are dollhouses, kitchen playsets, and other girly stuffs. Inside the shelves are also baby toys and books.
These are some of their book collections. The titles are a mix of baby and beginner readers’ books and a mix of english and tagalog titles.

Love these colourful rocking horses.

There are also wooden puzzles for busy hands.

These rides are so cute. There’s also a gas station to “fill ’em up”.

Okay, so maybe kitchen toys are not just for girls.

To keep the older kids preoccupied, there’s also a Playstation set up on the second floor. I wasn’t able to check the game titles though.

Also up on the second floor is the blocks room. There are tables where you can build imaginative creations using colourful blocks.

Look how this boy pours over the books! 🙂

CREATE
Apart from playing, the kids also get to do crafts in Kid’s Workshop. Here, the staff helps DA decorate his pet snake made out of foam boards.

Here, the girls make and decorate this happy looking pet lizard.

LEARN
In Kid’s Workshop, the staffs also facilitate learning activities for the kids. Here, they try to build towers using plastic cups, instilling the concept of balance in young children.

Even this young participant gets to try building a pyramid with the cups.

Here, the staff introduces the concept of playing Bingo to the kids.

INTERACT
According to the staff, they usually get a full house during weekends in the afternoon, with as many as 60 kids teeming the place. Wow! With that many kids, it really is a place to play and learn together with new and old friends alike. Just look at these new friends have their fun.

In case the kids get hungry, they also have a snack bar loaded with biscuit and chips. They can however, bring their own food.

Kids Parties
I also learned that they accept party reservations. Now that’s a fun idea! With so many fun things to do inside, your entertainment will already be taken cared of. You only have to bring the kids and the food. Their party packages start at P11,500 for 30 kids, inclusive of party host, party activities. The kids can even stay after the party for free!
Kids Funclub
This is their membership club that costs only P500 for 1 whole year. These are the perks of being a member:
- Discount coupons
- Birthday Treat – 1 free unlimited play which you can use any day of your birth month
- 15%+5% off on Birthday Parties
- Early bird discounts and priority bookings
- 75% off on KidsFunClub Get2Gether ticket. Guests at 50% off.
Rates
- Unlimited Play – P410
- One Hour Play – P300
- Level Up (from 1 hour to Unlimited Play) – P150
- Adult Pass – P50 (for guardians accompanying kids over 4 years old)
Tips
- Bring your own socks. Socks are a must inside. If you forget, you can always just purchase them there – P25 for kids, P30 for adults.
- Bring food and drinks. The kids may get hungry and thirsty from all the playing. Instead of buying inside, you can bring your own and just eat it there (just not inside the play area). There are even others who have fast food delivered there for their kids.
- Bring a guardian. I’d be more comforted if someone’s constantly watching over my child even if there are able staffs inside. It may get chaotic if there are so many kids inside.
- Set a limit with your child. When we were there, all the guardians had trouble convincing the kids to go. To help with this, let them know beforehand that when you come back to fetch them that it’s time to go.
To sum it all up, I love how being in Kid’s Workshop is not all about playing with slides or riding rocking horses but it’s also about learning and socializing too. It’s like going to a preschool where the kids get to do crafts, explore, sing, learn, and play. All these, while I get to do my own “play”, even for a little while. 🙂
Thanks again to Kid’s Workshop for having us and for making our stay truly enjoyable. Till next time!

Kid’s Workshop
2/f Shoppesville Arcade, Greenhills Shopping Center, San Juan
723-0932
0917-599-5324
kidsworkshopghills@gmail.com
http://www.kidsworkshopghills.com